Outlook Classic
1) Open your Outlook Classic app and Click on ‘File’ at the top-left. Click on ‘Account Settings’ and in the drop-down click ‘Account Settings…’.
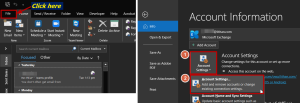
2) In the account settings window, select the ‘Email’ tab, click on your staff email ID, and click ‘Change’. In the Exchange Account Settings popup that appears, click on ‘More Settings’ at the bottom-left.
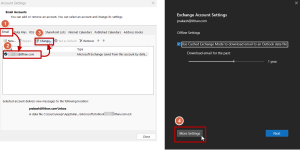
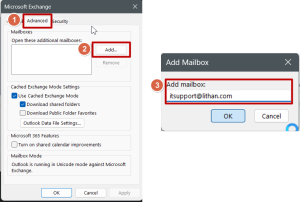
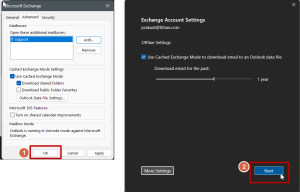
3) In the Microsoft Exchange window, select the ‘Advanced’ tab, and select ‘Add’, and then enter the shared email inbox ID in the Add Mailbox window and click OK. It will take some time, depending on your network connection and device specifications, to sync and add the account.
4) Once you see the Microsoft Exchange window with the shared mailbox in the list, click ‘OK’, and in the Exchange Account Settings window, click on ‘Next’.
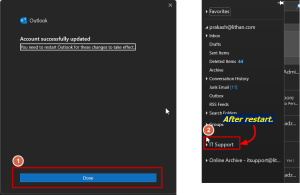
5) When you see an ‘Account successfully updated’ popup, click the ‘Done’ button at the bottom, and restart your Outlook app. After restarting, you can check your accounts list on the to see your shared mailbox. It will take time for the inbox to upload emails and archives, so please be patient.
Outlook on the web and New app
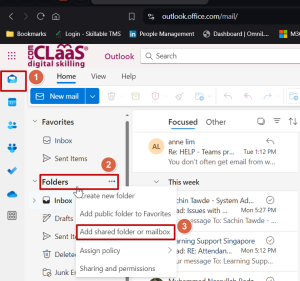
1) On your Outlook browser or Outlook 365 app, Select the ‘Mail’ icon, and right-click on your Folders/staff ID in the list and select ‘Add shared folder or mailbox’.
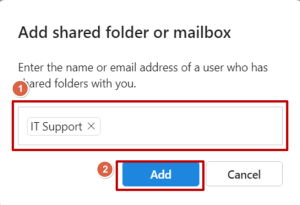
2) In the ‘Add shared folder or mailbox’ popup, enter the shared mailbox ID and click on ‘Add’
3) Refresh your page/restart your app and wait as the account syncs the mailbox. Do note that it can take some time for it to show on your account based on your network, and Exchange server sync speeds. It can take up to an hour for your shared mailbox to appear so please be patient if nothing happens initially.


